A hands-on guide on how to set up a Jenkins server with Nexus, Sonarqube and AD integration
A hands-on guide on how to set up a Jenkins server with Nexus, Sonarqube and AD integration
2 October 2020
Tiboo Augustijnen

During a recent project at FlowFactor, we set up a Jenkins server with a Nexus, Sonarqube and AD integration. It didn’t sound too complicated at first, but in the end, it wasn’t as easy as expected. We came across multiple obstacles and there were many company policies we had to follow. In this blog, I will show you how we have accomplished the installation of the software and in the next blog post, we are going to take a look at a pipeline with the software integrated.
1. Jenkins installation
In our environment, we have 1 Windows master and 3 slaves consisting of 2 Linux and 1 Windows machines.
– MASTER INSTALLATION
We installed the Jenkins, java OpenJDK and git via RHEL’s package manager and we adjusted the firewall so that Jenkins was reachable. We then added java to the path environment variable.
# master install
dnf install -y java-11-openjdk-headless.x86_64 java-11-openjdk-devel jenkins git
firewall-cmd — permanent — new-service=jenkins
firewall-cmd — permanent — service=jenkins — set-short=”Jenkins Service Ports”
firewall-cmd — permanent — service=jenkins — set-description=”Jenkins service firewalld port exceptions”
firewall-cmd — permanent — service=jenkins — add-port=8443/tcp
firewall-cmd — permanent — add-service=jenkins
firewall-cmd — zone=public — add-service=http — permanent
firewall-cmd — reload
firewall-cmd — list-all
systemctl enable jenkins
systemctl daemon-reload
systemctl start jenkins
cat > /etc/profile.d/java11.sh <<EOF
export JAVA_HOME=/usr/lib/jvm/java-11-openjdk
export PATH=\$PATH:\$JAVA_HOME/bin
export CLASSPATH=.:\$JAVA_HOME/jre/lib:\$JAVA_HOME/lib:\$JAVA_HOME/lib/tools.jar
EOF
. /etc/profile.d/java11.sh
#alternatives — config java
java — version
– JENKINS SERVICE
We adjusted values in the Jenkins service.
JENKINS_HTTPS_PORT=”8443"
…
JENKINS_HTTPS_KEYSTORE=”/etc/jenkins/jenkins.jks”
– JENKINS SLAVES (LINUX)
On the Linux slaves, Jenkins uses nodes for the javascript projects.
2. AD integration
https://plugins.jenkins.io/ldap/
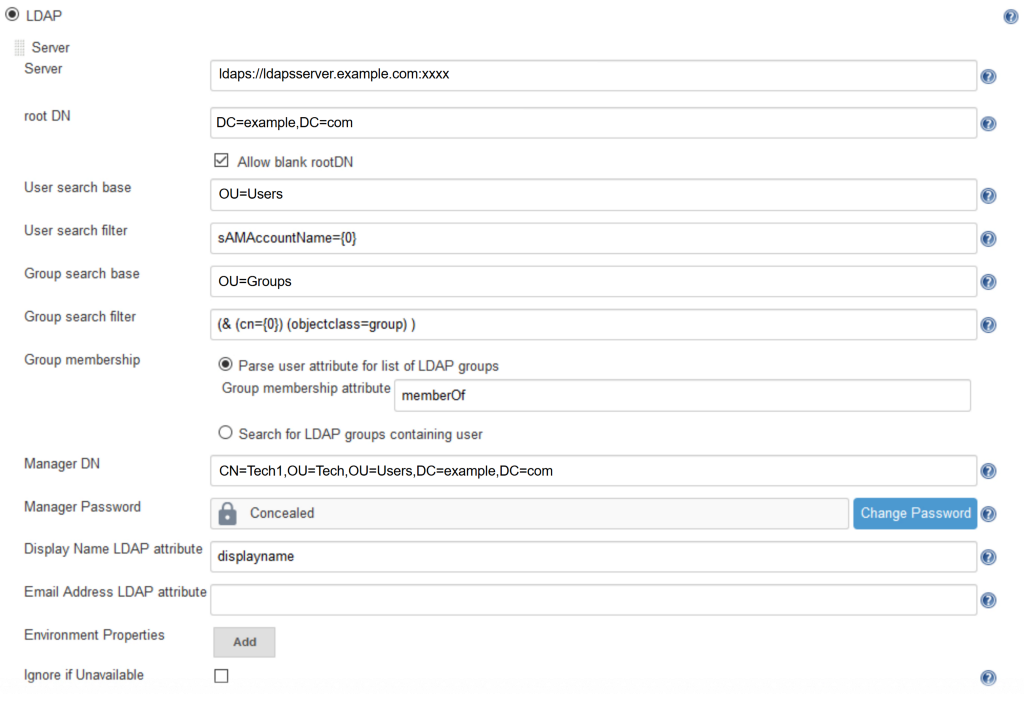
For the LDAP integration, we have used the Jenkins LDAP plugin.
The settings for the LDAP integration can be found in the Global Security section to manage Jenkins.

Fill in the fields according to your LDAP setup. We have created a technical user to be the Manager DN in order to authenticate with the LDAP server and parse the user attribute “memberOf” for listing the LDAP Groups. After you have filled in the values, make sure to test your connection by hitting the “Test LDAP settings” button. Now the users are able to log in and they are automatically placed in groups upon which we can define permissions.
This is done in the Manage and Assign Roles section and is available with the “Role-based Authorization Strategy” plugin in Jenkins. You need to choose Role-Based Strategy at the same location as the LDAP settings.

This opens the “Manage and Assign Roles” section. First, you need to create a role that will link with one of the groups in your LDAP setup. After creating the role and giving it permissions, you’ll have to add the LDAP group to Jenkins by adding the Group name to the list and by linking the group to a role. The group will have a user icon, but it is in fact a group. Now your LDAP users and groups are also in Jenkins.
3. Nexus OSS 3.21.1–01
3.1. INSTALLING NEXUS
– Creating a Nexus User
We have created a user on the nexus server to run the nexus service
useradd nexus -m
passwd nexus
– Installing Java 8 openJDK 64bit
su -c “dnf install java-1.8.0-openjdk”
– Download and extract
wget https://download.sonatype.com/nexus/3/latest-unix.tar.gz
tar -xzvf nexus-3.21.1–01-unix.tar.gz /opt
– Creating Nexus service
cat > /etc/systemd/system/nexus.service <<EOF
[Unit]
Description=nexus service
After=network.target
[Service]
Type=forking
LimitNOFILE=65536
ExecStart=/opt/nexus/bin/nexus start
ExecStop=/opt/nexus/bin/nexus stop
User=nexus
Restart=on-abort
[Install]
WantedBy=multi-user.target
EOF
– SELinux adjustment
When starting the Nexus service, we encountered an error in the logs which could be resolved by using the following commands. The commands were suggested by SELinux. This may not be the case with your installation, but it worked for us.
ausearch -c ‘(nexus)’ — raw | audit2allow -M my-nexus
semodule -X 300 -i my-nexus.pp
/sbin/restorecon -v /opt/nexus-3.21.1–01/bin/nexus
– Starting the service
sudo systemctl daemon-reload
sudo systemctl enable nexus.service
sudo systemctl start nexus
3.2. Nexus LDAP configuration
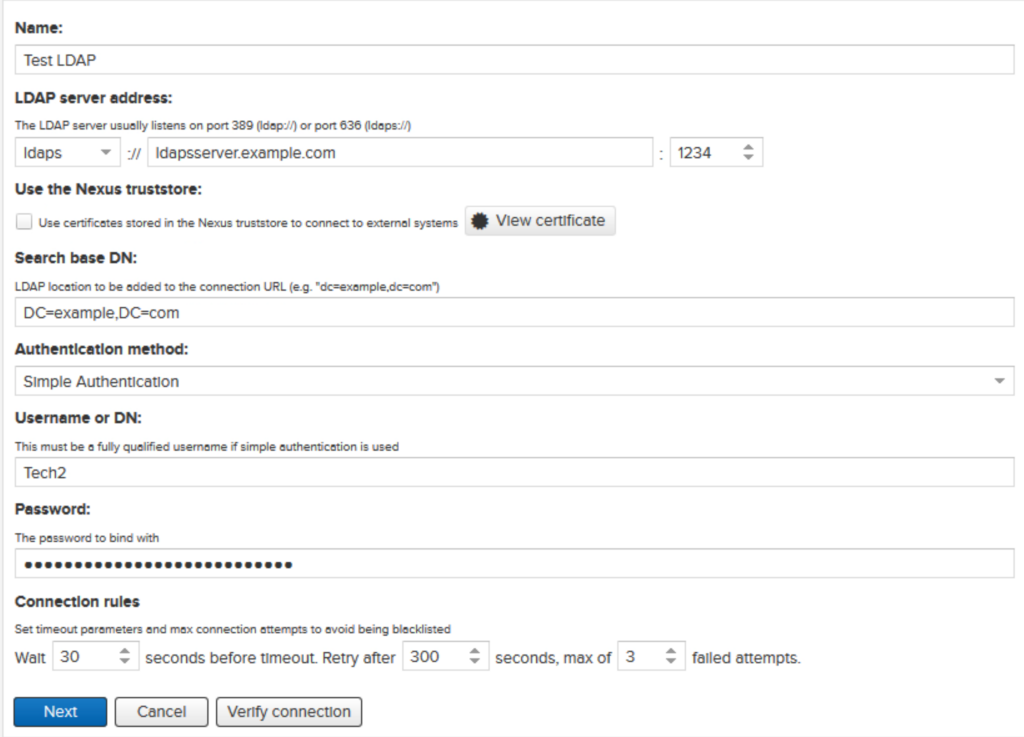
We will now integrate Nexus with LDAP. This can be done in the security settings under LDAP.
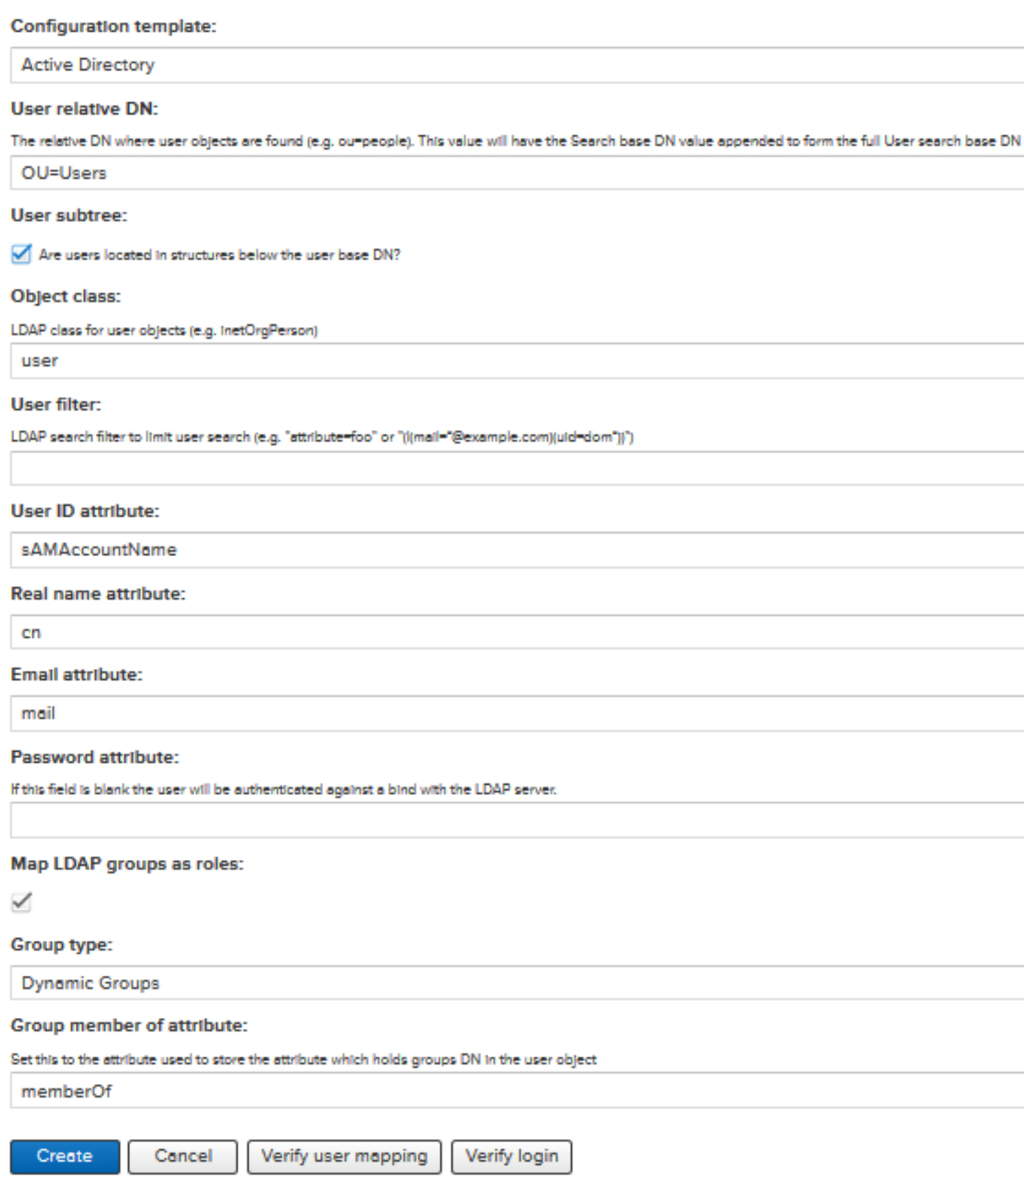
The first window we get when we add a new LDAP connection is for the connection itself. The next one is for the Users and Groups. Before we go to the User and Group settings, you can try to see if the connection works.

In the User and Group settings, we chose Active Directory as a template. Fill in the fields according to your LDAP setup. Just like the Jenkins LDAP setup, we have created a technical user for authentication requests with the server.

Users are now able to login to Nexus with their LDAP user.
3.3. SSL configuration
First, we need to create a keystore with the following command and move the keystore to the correct location.
keytool -importkeystore -srckeystore nexus.pfx -srcstoretype pkcs12 -destkeystore keystore.jks -deststoretype JKS
mv keystore.jks /opt/sonatype-work/nexus3/etc/ssl/
Next, we will add a few configuration lines to the nexus.properties files with the following command
cat > /opt/sonatype-work/nexus3/etc/nexus.properties <<EOF
application-port-ssl=8443
nexus-args=${jetty.etc}/jetty.xml,${jetty.etc}/jetty-http.xml,${jetty.etc}/jetty-https.xml,${jetty.etc}/jetty-requestlog.xml
ssl.etc=${karaf.data}/etc/ssl
EOF
We don’t want the password to be readable, so we will obfuscate the password. Run the command and fill in the password, you will then get the obfuscated password.
java -cp jetty-util/9.4.18.v20190429/jetty-util-9.4.18.v20190429.jar org.eclipse.jetty.util.security.Password
Now we are going to edit the jetty-https.xml file. Before the line containing `<Set name=”KeyStorePath”>`, you need to add a new line containing the alias name of your keystore file PrivateKeyEntry.
<Set name=”certAlias”>te-webserverv2-b733b8f4–06c2–4c0a-87f8-a753b3d25897</Set>
Fill in the obfuscated password (Make sure all three passwords have the same value (required)).
<Set name=”KeyStorePassword”>password</Set>
<Set name=”KeyManagerPassword”>password</Set>
<Set name=”TrustStorePassword”>password</Set>
Just like Jenkins, we couldn’t change the port to 443 because we are executing Nexus as a non-root user. Therefore, we have added firewall port forward rules to map port 8443 to 443. We have also created a new service and added the specified port to it.
firewall-cmd — permanent — new-service=nexus
firewall-cmd — permanent — service=nexus — add-port=8443/tcp
firewall-cmd — permanent — zone=public — add-forward-port=port=443:proto=tcp:toport=8443
firewall-cmd — permanent — add-service=nexus
firewall-cmd — reload
4. Sonarqube
4.1 Install Sonarqube
Sonarqube requires a database for the installation. You can use a few database engines like Microsoft SQL Server, Oracle or PostgreSQL but we will not go into detail about the database installation today.
We have created a “Sonarqube” user for the server to execute Sonarqube on all three servers.
useradd sonarqube -m
passwd sonarqube
Next, we will install Java 11 openJDK
su -c “dnf install -y java-11-openjdk-headless.x86_64 java-11-openjdk-devel”
Download and unzip Sonarqube
wget https://binaries.sonarsource.com/Distribution/sonarqube/sonarqube-8.2.0.32929.zip
unzip sonarqube-8.2.0.32929.zip -d /opt
! We didn’t create a symbolic link for Sonarqube because it will not work in the service.
We will have to create some directories for Sonarqube
mkdir /sonardata
mkdir /sonardata/data
mkdir /sonardata/temp
Adjust some values in the sonar.properties file located in /opt/sonarqube/conf
sonar.jdbc.url=jdbc:sqlserver://mssqlserver.example.com;databaseName=SonarQube
sonar.jdbc.username=SonarQube
sonar.jdbc.password=password123
sonar.web.javaOpts=-server
sonar.path.data=/sonardata/data
sonar.path.temp=/sonardata/temp
Before we can create and run Sonarqube as a service, we have to make it executable
chmod +x /opt/sonarqube/bin/linux-x86–64/sonar.sh
chmod +x /opt/sonarqube/bin/linux-x86–64/wrapper
chmod +x /opt/sonarqube/elasticsearch/bin/elasticsearch
Creating Sonarqube service
cat > /etc/systemd/system/sonarqube.service <<EOF
[Unit]
Description=SonarQube service
After=syslog.target network.target
[Service]
Type=simple
User=sonarqube
Group=sonarqube
PermissionsStartOnly=true
ExecStart=/bin/nohup /bin/java -Xms32m -Xmx32m -Djava.net.preferIPv4Stack=true -jar /opt/sonarqube/lib/sonar-application-8.2.0.32929.jar
StandardOutput=syslog
LimitNOFILE=65536
LimitNPROC=8192
TimeoutStartSec=5
Restart=always
SuccessExitStatus=143
[Install]
WantedBy=multi-user.target
EOF
Starting a Sonarqube service
sudo systemctl daemon-reload
sudo systemctl enable sonarqube.service
sudo systemctl start sonarqube
Setting kernel parameters for max open files
cat > /etc/sysctl.d/99-sonarqube.conf <<EOF
vm.max_map_count=262144
fs.file-max=65536
EOF
sysctl — system
sysctl -a |grep max
4.2. Sonarqube LDAP configuration (/OPT/SONARQUBE/CONF/SONAR.PROPERTIES)
For the delegation of authorization, groups need to be defined in SonarQube first. Then, the following properties (group.baseDn, group.request) must be defined to allow SonarQube to automatically synchronize the relationships between users and groups.
sonar.security.realm=LDAP
sonar.authenticator.downcase=true
ldap.url=ldaps://ldapsserver.example.com:1234
ldap.bindDn=CN=Tech4,OU=Users,DC=example,DC=com
ldap.bindPassword=…
ldap.user.baseDn=OU=Users,DC=example,DC=com
ldap.user.request=sAMAccountName={0}
ldap.user.realNameAttribute=cn
ldap.user.emailAttribute=mail
ldap.group.baseDn=OU=Groups,DC=example,DC=com
ldap.group.request=(&(objectClass=group)(member={dn}))
If you want more LDAP servers in your config file, this can be done by adjusting your config like this:
sonar.security.realm=LDAP
ldap.servers=server1,server2
sonar.server1.authenticator.downcase=true
sonar.server2.authenticator.downcase=true
…
And you are ready to go to set up your next Jenkins Server. Do you need some more help? Or do you want work on some challenging projects yourself?

Sorry, the comment form is closed at this time.