
Creating a private external image registry for OpenShift 4.3
Creating a private external image registry for OpenShift 4.3
31 March 2020
Niel De Boever

In this tutorial I will be setting up a Sonatype Nexus 3 repository manager to act as an external private image registry for an OpenShift 4.3 cluster. This tutorial will cover the installation and configuration of the Nexus, pushing a docker image to the registry and deploying it to an OpenShift cluster.
The Nexus instance is located outside of the OpenShift cluster. This external instance will be configured on version 7 of Red Hat Enterprise Linux.
INSTALLING SONATYPE NEXUS 3
Sonatype Nexus is one of the best repository managers out there. It is a tool that you cannot avoid in your CI/CD pipeline. It effectively manages deployable artifacts.
Since there is no package available within the yum package manager for Sonatype Nexus, it must be downloaded manually.
Update yum repositories and install prerequisite utilities.
sudo yum update -y
sudo yum install wget -y
sudo yum install java-1.8.0-openjdk.x86_64 -y
Create an installation directory.
mkdir /opt/nexus
cd /opt/nexus
Download the latest Nexus version. The latest download links can be found here.
sudo wget -O nexus.tar.gz https://download.sonatype.com/nexus/3/latest-unix.tar.gz
Untar the downloaded file and rename it for easier use.
sudo tar -xvf nexus.tar.gz
sudo mv nexus-3* nexus
Since it is not recommended to run Nexus as root, create a separate nexus user.
sudo adduser nexus
Change the ownership of the installation directory.
sudo chown -R nexus:nexus /opt/nexus/
Edit /app/nexus/bin/nexus.rc file and set the following parameter.
sudo vi  /opt/nexus/nexus/bin/nexus.rc
run_as_user="nexus"
Add firewall rules.
firewall-cmd --zone=public --permanent --add-port=8081/tcp
firewall-cmd --reload
Adding the system service.
Create a nexus systemd unit file and add the following content.
sudo vi /etc/systemd/system/nexus.service
[Unit]
Description=nexus service
After=network.target
[Service]
Type=forking
LimitNOFILE=65536
User=nexus
Group=nexus
ExecStart=/opt/nexus/nexus/bin/nexus start
ExecStop=/opt/nexus/nexus/bin/nexus stop
User=nexus
Restart=on-abort
[Install]
WantedBy=multi-user.target
Start and enable the service on boot.
sudo systemctl start nexus
sudo systemctl enable nexus
Logging in.
Everything should be set up now and the nexus should be available at
http://[Server IP]:8081
The default username is admin.
The default password can be found in /opt/nexus/sonatype-work/nexus3/admin.password.
cat /opt/nexus/sonatype-work/nexus3/admin.password
CREATING THE DOCKER REGISTRY.
First log in and click on Server administration and configuration.
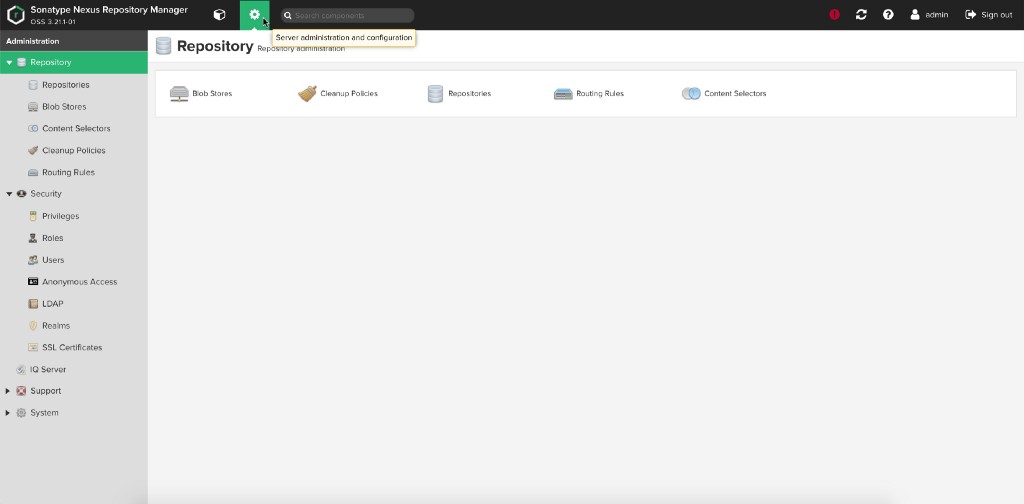
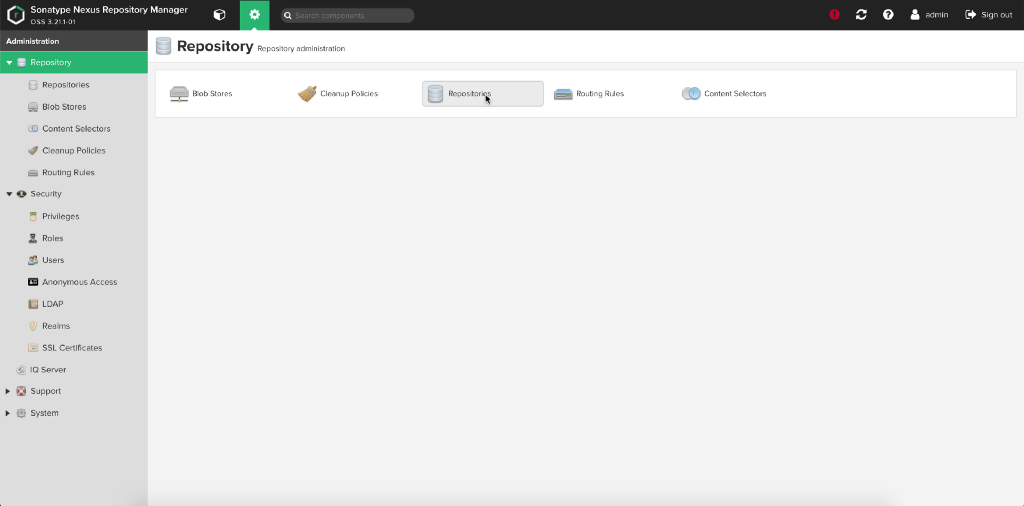
Go to Repositories.
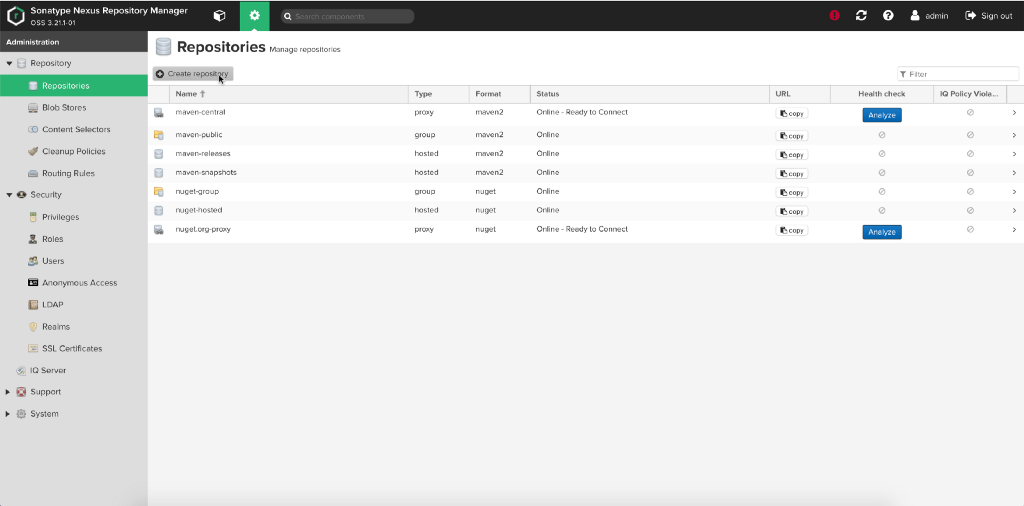
Create a new repository.
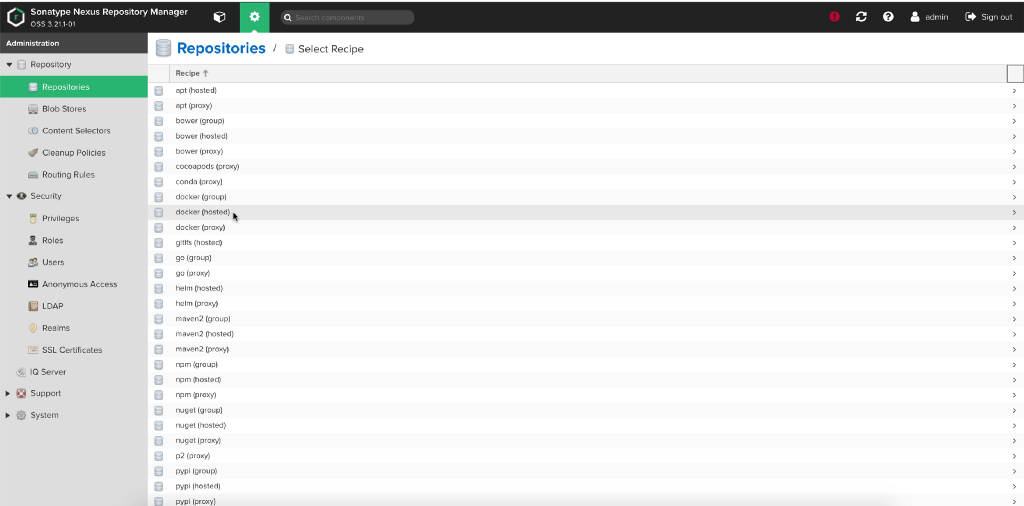
Select docker (hosted).
Choose a name, http port and enable Docker V1 API support.
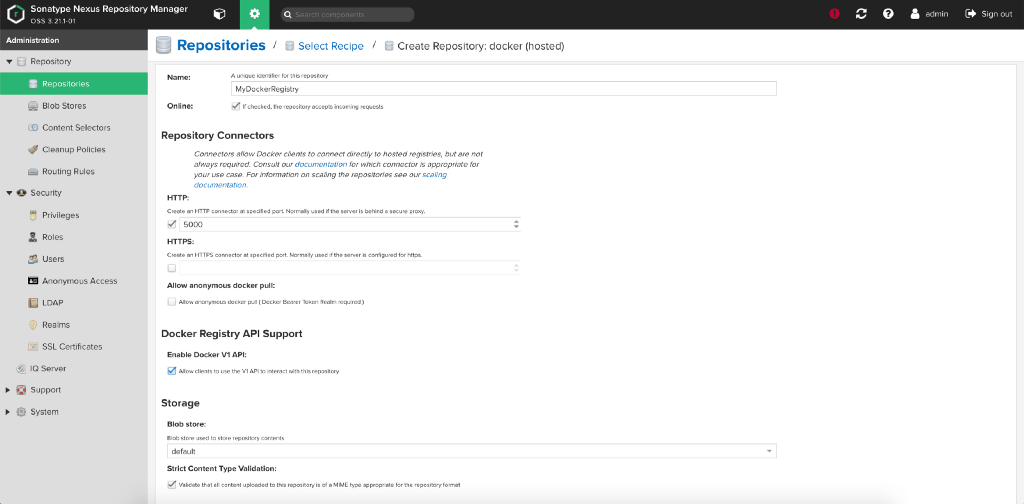
Now the docker registry should be all set. But when trying to log in to your private docker registry, you will get something like this:
docker login [Server IP]:5000 -u [nexusUser]
Error response from daemon: Get https://[Server IP]:5000/v2/: http: server gave HTTP response to HTTPS client
Since Docker only accepts https secure traffic, we have to set up a reverse proxy with a valid tls certificate in front of the Nexus.
SETTING UP THE REVERSE PROXY
There are multiple options for setting up a reverse proxy, but for this tutorial I will be using Nginx as reverse proxy and Let’s Encrypt Certbot for generating the tls certificates.
Before setting up the reverse proxy, there is one prerequisite. You must have a DNS A Record that points the domain name to the public IP address of your server. This is required because of how Let’s Encrypt validates that you own the domain it is issuing a certificate for.
Install Nginx.
sudo yum install nginx -y
sudo systemctl start nginx
sudo systemctl enable nginx
Install Certbot.
sudo yum install epel-release -y
sudo yum install certbot-nginx -y
Configure Nginx.
Edit the default nginx.conf file. Find the existing server_name line and replace the _ with your domain name:
vi /etc/nginx/nginx.conf
server_name _;
## to
server_name example.com www.example.com;
Verify if the config works and reload the service.
sudo nginx -t
sudo systemctl reload nginx
Add firewall rules.
sudo firewall-cmd — add-service=http
sudo firewall-cmd — add-service=https
sudo firewall-cmd — runtime-to-permanent
Generating the certificate.
Start certbot and follow the instruction prompts.
sudo certbot --nginx -d example.com -d www.example.com
Configure your HTTPS settings to make all requests redirect to secure HTTPS.
At the end of the certbot instructions, you are prompted with a message telling you the process was successful and where your certificates are stored.
Now the only thing left to do is setting the right port in nginx config file.
When you open the file again, you will see that certbot added some stuff.
Now we will edit the location / block of each server to redirect to the localhost on port 5000 (or whatever port you chose for your docker registry).
vi /etc/nginx/nginx.conf
Server {
  ...
  location / {
    proxy_pass http://127.0.0.1:5000/;
    proxy_set_header Host $http_host;
  }
  ...
}
When you reload the nginx service, the docker registry should now be available via https on https://example.com and you shouldn’t be getting any more errors when logging in.
You might run into an error when trying to push a large image saying:
413 Request entity too large
To fix this, just add the following line to the http block of the nginx.conf file:
http {
    ...
    # disable any limits to avoid HTTP 413 for large image uploads
    client_max_body_size 0;
    ...
}
PUSHING IMAGES
Log in to your private docker registry from the command line.
docker login [Server Domain Name] -u [nexusUser]
As an example we will pull the official hello-world docker image, re-tag it and push it to our own private docker registry.
docker pull hello-world:latest
docker tag hello-word:latest [Server Domain Name]/my-world:latest
docker push [Server Domain Name]/my-world:latest
DEPLOYING IMAGES TO OPENSHIFT
To use our image in an OpenShift cluster we first need to log into the docker registry from the OpenShift cluster. This is done by create a docker-registry secret.
oc create secret docker-registry regsecret --docker-server=https://[Server Domain Name]/ --docker-username=[nexusUser] --docker-password=[nexusPassword]
This should be enough to get access to the registry, now you can specify the image location in a deployment.yaml file and deploy it to the cluster.
apiVersion: extensions/v1beta1
kind: Deployment
metadata:
  name: my-world
  namespace: default
  labels:
    app: my-world
spec:
  replicas: 1
  template:
    metadata:
      labels:
        app: my-world
    spec:
      containers:
      - name: my-world
        image: [Server Domain Name]/my-world:latest
        ports:
        - containerPort: 80
      imagePullSecrets:
      - name: regsecret
oc create -f deployment.yaml
There you go! If you found this tutorial helpful but you need some more, don’t hesitate to let us know, we’re happy to help!

Sorry, the comment form is closed at this time.