Expose remote services with SSH
15 November 2019
Dusty Lefevre

Have you ever found yourself in the following situation? You’re expected to maintain a set of remote systems running several applications. However, these services are not accessible to you.
The only way to access the remote infrastructure may be through a jump server or bastion using SSH. You may not have direct access to the remote application. They might be only accessible from a virtual desktop environment. This virtual desktop may lack the tools you require to get the job done. Or, it may be necessary to act quickly, and you can’t wait for a network engineer to apply the required firewall changes.
It’s in cases like this that you sometimes have to become … “creative.”
In this post, we will focus on a specific case where we need to access web-based applications. The applications are hosted remotely, on infrastructure that is only accessible through a jump server using SSH. We will transparently expose these applications to our local workstation using SSH local port forwarding.
Forwarding ports
Port forwarding is a feature that allows you to direct network traffic between both ends of an SSH connection. Local port forwarding will listen on the client-side of the SSH connection (e.g., your workstation) and pass it to a target on the server-side. Remote port forwarding accomplishes the opposite. The SSH tunnel forwards traffic from a port on the server-side to a target on the client-side. Dynamic port forwarding instructs SSH to act as a SOCKS proxy.
We can still face a number of obstacles when setting up a tunnel. Although enabled by default, port forwarding (server-side) may be prohibited by sshd configuration. Also, depending on your workstation, you may not be able to bind to ports below 1024. To do this, you must run your SSH client as root.
For our example, however, let’s assume that no measures were taken to prevent port forwarding and that you are the lord and master of your machine.
The task at hand
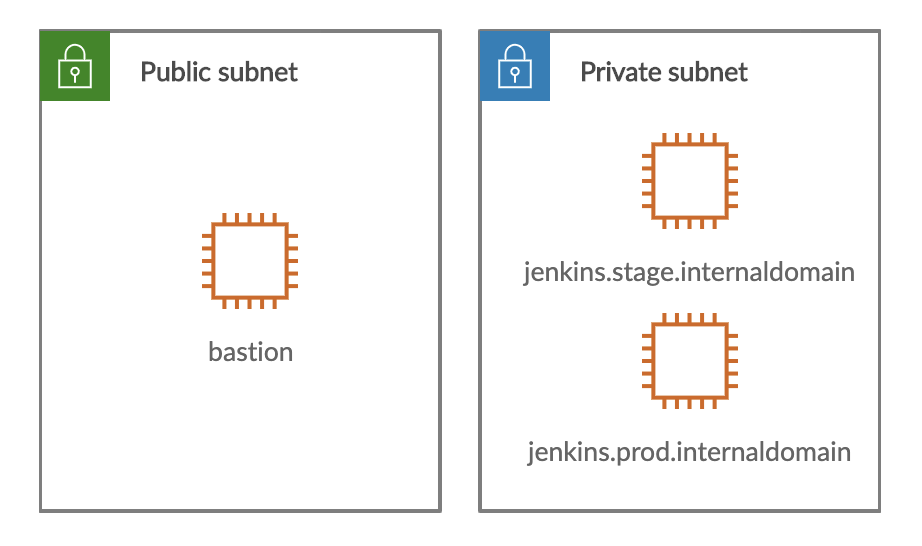
To gain access to the remote infrastructure, we only have an external jump server (bastion). We can access the jump server with SSH using a private key, so we don’t need a password. From the jump server, we have access to private network systems with SSH and the same key.

The two Jenkins instances are bound to a unique domain name and listen on port 8080. But how would we expose these two services to our workstation? For this straightforward example, we can forward unique local ports to both instances. However, this may cause issues for some of Jenkins’s features. Jenkins will expect the hostname used to access the web-interface to match the one in the configuration. Therefore, we will have to expose them transparently.
Local endpoints
First of all, we must ensure that both target domain names are converted to a valid IP address on our workstation. We will resolve both domains to loopback addresses in our workstation’s hosts file:
127.0.1.1 jenkins.stage.internaldomain
127.0.1.2 jenkins.prod.internaldomain
On Linux and Mac, you will find the hosts file in /etc/hosts. On Windows, you will find it at c:\Windows\System32\drivers\etc\hosts. You need elevated privileges to modify it.
A Mac system, or any BSD based system for that matter, only defines the 127.0.0.1 loopback address. We have to add aliases to the lo0 interface explicitly by executing:
> sudo ifconfig lo0 alias 127.0.1.1 up
> sudo ifconfig lo0 alias 127.0.1.2 up
> ifconfig lo0
lo0: flags=8049<UP,LOOPBACK,RUNNING,MULTICAST> mtu 16384
options=1203<RXCSUM,TXCSUM,TXSTATUS,SW_TIMESTAMP>
inet 127.0.0.1 netmask 0xff000000
inet6 ::1 prefixlen 128
inet6 fe80::1%lo0 prefixlen 64 scopeid 0x1
 inet 127.0.1.1 netmask 0xff000000
inet 127.0.1.2 netmask 0xff000000
nd6 options=201<PERFORMNUD,DAD>
Creating aliases is unnecessary on Windows or Linux.
Drilling a tunnel
There is only one thing left to do: connect to the remote infrastructure and forward the necessary ports. First, we initiate a connection to the jump server and forward locally bound ports (using the -L option). The Jenkins instances are not accessible form the jump server, so we will have to use an intermediary target.
> ssh -L jenkins.stage.internaldomain:8080:localhost:18080 \
-L jenkins.prod.internaldomain:8080:localhost:28080 \
-A ec2-user@bastion.mydomain.com
Next, we have to forward the intermediary ports on the bastion to the appropriate target on both Jenkins hosts. Since we may want to reuse those connections in the future, let’s make them persistent.
> nohup ssh -L 18080:jenkins.stage.internaldomain:8080 \
            -n -N -o ServerAliveInterval=60 \
            jenkins.stage.internaldomain &> nohup ssh -L 28080:jenkins.prod.internaldomain:8080 \
            -n -N -o ServerAliveInterval=60 \
            jenkins.prod.internaldomain &
The nohup command will prevent the SSH connection from shutting down after we disconnect from the jump server. The keepalive interval will prevent the SSH connection from being closed due to inactivity (quite a common practice).
The proof of the pudding
The only thing left to do is verify that our tunnels work:
> curl -s http://jenkins.prod.internaldomain:8080/login \
  | grep environment
    <h1>Jenkins (production environment)</h1>> curl -s http://jenkins.stage.internaldomain:8080/login \
  | grep environment
    <h1>Jenkins (staging environment)</h1>
The SSH client forwards the request on port 8080 to the jump server. There, the sshd daemon creates an outbound connection to localhost:18080. Next, the client connected to jenkins.stage.internaldomain will forward the requests once more to the appropriate host. There, sshd will connect to the Jenkins instance.
In this example, we have set up explicit connections with the Jenkins hosts to forward the necessary traffic. However, this is not always required. Forwarding requests to any host that can reach the final target is sufficient.
Final note
SSH port forwarding can be extremely useful for accessing remote services. And I have seen situations where it was even used at scale to permanently expose remote applications to development and support teams. This setup included scripts to create and monitor SSH tunnels, a client application for workstations, etc.
While it is possible to use SSH for such setups, a proper VPN/Firewall setup will most likely be a more appropriate solution for permanent access.
Do you have some more questions? Don’t hesitate to contact us, we’re happy to help!

Sorry, the comment form is closed at this time.